Use *service to Embed Outside Apps and Other Tools🔗
There's a lot that GuidedTrack can do, but with *service the possibilities are nearly endless. Show your users the current weather, generate a random image of a kitten, provide recipes and currency conversions, add job searching from Indeed, and the list goes on. If a person or company offers a web API for it, then you can most likely add it to your GuidedTrack program!
For instance, RapidAPI has a database chock-full of public and private APIs that can be easily added to GuidedTrack. Search for an app that interests you, and when you find one, create an account (it's free to join) and follow the steps below.
Beyond RapidAPI, you can add APIs from just about any other source, as long as they're compatible with basic authentication and custom headers over HTTP (and probably about 90% of APIs out there will fit these restrictions).
There are two parts to adding a *service: (1) setting it up in the settings page, and (2) adding the GuidedTrack code.
Part 1: Setting up the Settings page🔗
In this example, we'll walk you through working with Airtable from your GuidedTrack program.
Please be mindful that, depending on the API you are using, the authentication method and requests they accept may be different; so be sure to read the documentation for any API you want to use in order to understand how it works.
1.1. Set up an Airtable account. Go to Airtable.com, create an account, then create a new base. You'll want to avoid using spaces or special characters in the title of your base or in any of its tabs (sheets).
1.2. Generate a personal access token. Follow this link, and generate the token that you will use to connect your program to the Airtable base. Make sure that you copy it, because it is only displayed once - i.e., if you lose it, you will need to generate a new token.
1.3. Find your base ID. Go to Airtable's API Reference and it will be displayed when you select the base you want to interact with from your program.
1.4. Add the service to your GT program settings. Navigate to the "Settings" page in your GuidedTrack program, select the "Services" tab, and click on "New Service". Configure it this way:
| Field | Value |
|---|---|
| Name | NAME_OF_SERVICE |
| URL | https://api.airtable.com/v0/YOUR_BASE_ID |
Airtable requires that the authorization is done via header parameters. Click on "Add header" and enter the following values:
| Field | Value |
|---|---|
| Key | Authorization |
| Value | Bearer [YOUR_PERSONAL_TOKEN] |
- NAME_OF_SERVICE is the name that you will use to invoke the service. In this example we will set the name of the service to "Airtable", but you may choose any name that helps you identify the service. You will use this name to call the service from within your program.
- As mentioned, the authentication method is defined by the service provider. So if you are configuring another API service, check their requirements in their documentation. At the end of this tutorial you can find examples of configuration and interaction with other useful API services.
Your service settings will look something like this:
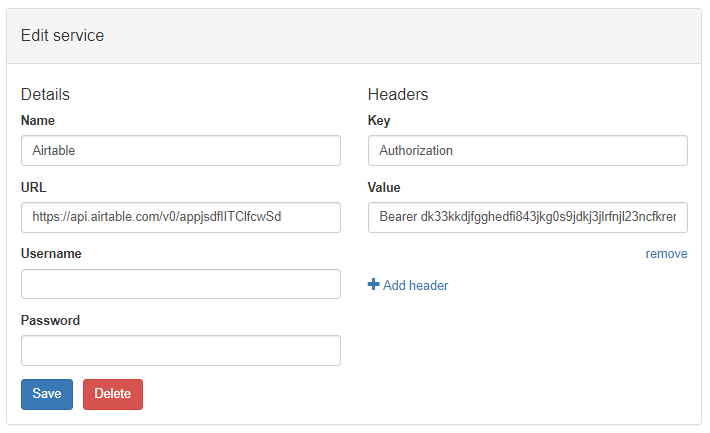
1.5. Save. Once that's done, click "Save", and you'll be ready to write your GT code!
Part 2: Adding GuidedTrack Code🔗
We are going to demonstrate how you can interact with Airtable from your GuidedTrack program using a simple base that has a table called "PhoneBook" which, in turn, has two columns: "Name" and "Phone":
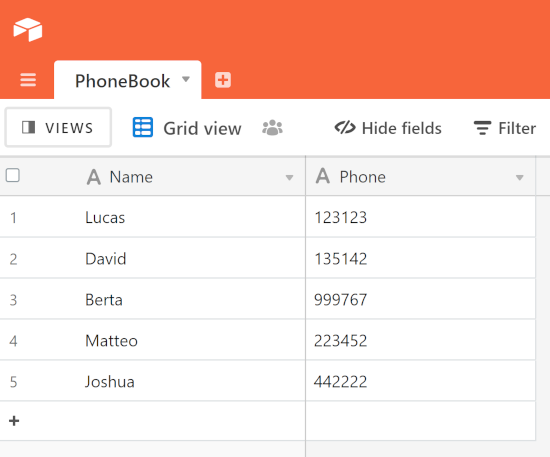
Notice that we have avoided using spaces and special characters in our table and column names.
2.1. Add a record to the table using a POST request.🔗
Use and modify this code based on your own Airtable tab name, column headings, and GuidedTrack variables:
*question: What's your name?
	*save: userName

*question: What's your phone number?
	*save: userNumber
	*type: number

>> dataToSend = {"fields" -> {}}
>> dataToSend["fields"]["Name"] = userName
>> dataToSend["fields"]["Phone"] = "{userNumber}"

*service: Airtable
	*path: /PhoneBook
	*method: POST
	*send: dataToSend
	*success
		>> recordInserted = 1
	*error
		>> recordInserted = 0
		>> error = it

*if: recordInserted = 1
	Success! You just added a number to the phone book.

*if: recordInserted = 0
	There was an error writing to the phone book.
	Here are the details: {error}
Let us examine what the code does in detail.
In the first lines of code after the two questions, we created and populated an association of associations with the values to insert into the table. If the person running the program entered "Joshua" for name and "123444" for the phone number, the value of the variable dataToSend would become:
{ "fields" -> { "Name" -> "Joshua", "Phone" -> "123444" } }
This matches the format specified in the documentation of the Airtable API. Note that the keys of the association inside "fields" are the same as the name of the columns in the Airtable base.
Are you wondering why these two lines of code are different?
>> dataToSend["fields"]["Name"] = userName
>> dataToSend["fields"]["Phone"] = "{userNumber}"
This is because userName is a text type variable, whereas userNumber is a number type variable. By surrounding a number variable with {curly brackets} and putting it in between "quotes", we convert it into text to match the specification of the table.
Once the data to send has been set up, we added the *service keyword and included the name we gave to our service, which in this case was "Airtable".
The *path keyword is used when your service has multiple locations within the same domain. This is just like a website URL: when we defined the service in the configuration tab we gave it a base URL, and now we want to specify which part of the site to go to. In this case, we need to add the name of the table to which we want to add our data.
The *method indicates what kind of request we are making. In this example, we're making a POST request. The documentation of the API will let you know which method you need to use depending on what you want to do.
The *send keyword is used to send an association of data to the server that hosts the API (e.g. Airtable). This data will be used by the server to perform some operation and/or return other data.
Lastly, we used *success and *error to get certain information about what happened (the result, or the data you're interested in). Under each, we specified things for GT to do in the case of success or failure.
There are a few restrictions on what can be indented under a *success or *error block. By and large, the guiding principle is that it shouldn't be anything that breaks the page or messes with the program flow, so no *question, *button, or *goto keywords.
The other thing to know about *success and *error is that inside of each of them you get access to the special it variable (just like in *events). This is a temporary variable that can only be used inside of the block, and it holds the response the server sends back. It's usually in the form of an association. It's important to save the important pieces of this variable as something else so that you don't lose it if you intend to use it later on.
While you can theoretically save the entire output by assigning it to a new variable, this is not necessarily a good idea because the output may store a lot of information you are not interested in and which you might not want to include in your program's CSV data.
2.2. Getting entries from a table using a GET request🔗
The code below is performing a search for all records in the table named "PhoneBook" (notice the table name in the *path), sending as query parameters the maximum number of records we want to receive:
*service: Airtable
	*path: /PhoneBook
	*send: {"maxRecords" -> 2}
	*method: GET
	*success
		>> retrieved = it["records"]
	*error
		An error occurred!
This next piece of code searches in the same table, filtering the results where the field "Name" has the value "Joshua":
*service: Airtable
	*path: /PhoneBook?filterByFormula=%7BName%7D='Joshua'
	*method: GET
	*success
		>> retrieved = it["records"]
	*error
		An error occurred!
These are two ways to send query parameters with GET requests. In the first example, the query parameters are sent in an association using the attribute *send. In the second, the query string is added to the path.
*path needs to be URL-encoded. You may find this tool useful for generating the path for your searches in Airtable.
Airtable returns a collection of records. If the query returns just one record, it will still be inside a one-item collection. The value of the variable retrieved in the second example looks like this in JSON format (which is basically the same as GT's associations except that it uses "key: value" syntax instead of "key -> value" synax):
[
	{
		"id": "rec7XZwp1KcwwMAG0",

		"fields": {
			"Phone": "442222",
			"Name": "Joshua"
		},

		"createdTime": "2020-06-11T07:14:06.000Z"
	}
]
The code below would store Joshua's phone number into a variable:
>> joshuaNumber = retrieved[1]["fields"]["Phone"]
2.3. Updating a record using a PATCH or PUT request🔗
In Airtable, you can use PATCH and PUT requests to update records in a table. When you use a PATCH request, the fields that you send in your request get updated, and the ones that you did not send retain the value they had before you sent your request. On the other hand, a PUT request will clear the fields that you have not specified in your request.
In order to update a record, you need to have its ID, which you can do by performing a search like in the second example of the previous section. The code below shows how to retrieve the ID of Joshua's record:
>> joshuaID = retrieved[1]["id"]
The code below shows how you would update Joshua's phone number to "444444":
>> dataToSend = {"fields" -> {}}
>> dataToSend["fields"]["Phone"] = "444444"

*service: Airtable
	*path: /PhoneBook/{joshuaID}
	*method: PATCH
	*send: dataToSend
	*success
		>> recordInserted = 1
	*error
		>> recordInserted = 0
		>> error = it
Since we are using a PATCH request and sending just the phone number, the name will remain the same in the table. A PUT request would have cleared the name field. Note that you must add the ID of the record to update to the path of your request.
Other uses of *service🔗
Below are examples of how *service has been applied to other APIs (more will be added in the future):
- Generate a PDF using APITemplate.io: APITemplate.io allows you to create pdf (and image) templates that you can then fill in with data from your GuidedTrack program.
- Using Zapier and IFTTT with Google Sheets: Zapier and IFTTT can connect your GuidedTrack program to the APIs of hundreds of other apps and services. For example, it can help you connect to Google Calendar, Calendly, Trello, Evernote, Eventbrite, Twitter, and hundreds more. In this example, see how to add GuidedTrack variables as rows in Google Sheets.
- Use
*serviceto access your Mailchimp mailing list: If you have a Mailchimp account, you can access it from your GuidedTrack program. This means that you can collect the email address of your program users and add it to your Mailchimp audience, check the information of existing subscribers and update it.
Next: Custom Services